Most homeowners we speak to in Ottawa spend weeks picking out the perfect 4K projector, only to realize too late that their floor plan makes the back row feel like an afterthought. It’s a common worry; you don’t want to over-invest in a luxury space that feels cramped or fails to meet professional standards. You deserve a room where every guest has a clear sightline and enough room to actually relax. Using a professional home theater seating layout planner is less about furniture and more about creating a structural blueprint for your home.
We understand the pressure of getting a six-figure renovation right the first time. In this guide, we’ll show you how to calculate perfect riser heights and row spacing while managing technical rules like the 2026 NEC updates for GFCI and AFCI protection. We’ll address the real-world costs of high-end builds, common pitfalls to avoid, and the specific questions you should ask your contractor. You’ll learn the exact dimensions needed for 24 inch wide seats and the 72 inch depth required for power recliners. By the end, you’ll have the confidence to partner with a team that treats your cinema as a high-stakes technical project rather than just another basement finish.
Key Takeaways
- Learn why successful projects start with the viewing experience rather than the room’s dimensions to avoid a cramped or dysfunctional layout.
- Use a professional home theater seating layout planner to master the precise math behind riser heights and row spacing for unobstructed sightlines.
- Discover how to navigate Ottawa-specific constraints, such as standard 7 to 8 foot basement ceilings, without sacrificing tiered seating comfort.
- Understand the real-world costs of high-end theater builds and why purchasing furniture before finalizing your structural plan is a costly mistake.
- Identify the critical technical questions to ask your contractor to ensure they understand current 2026 electrical codes and high-end cinema standards.
The Fundamentals of a Home Theater Seating Layout Planner
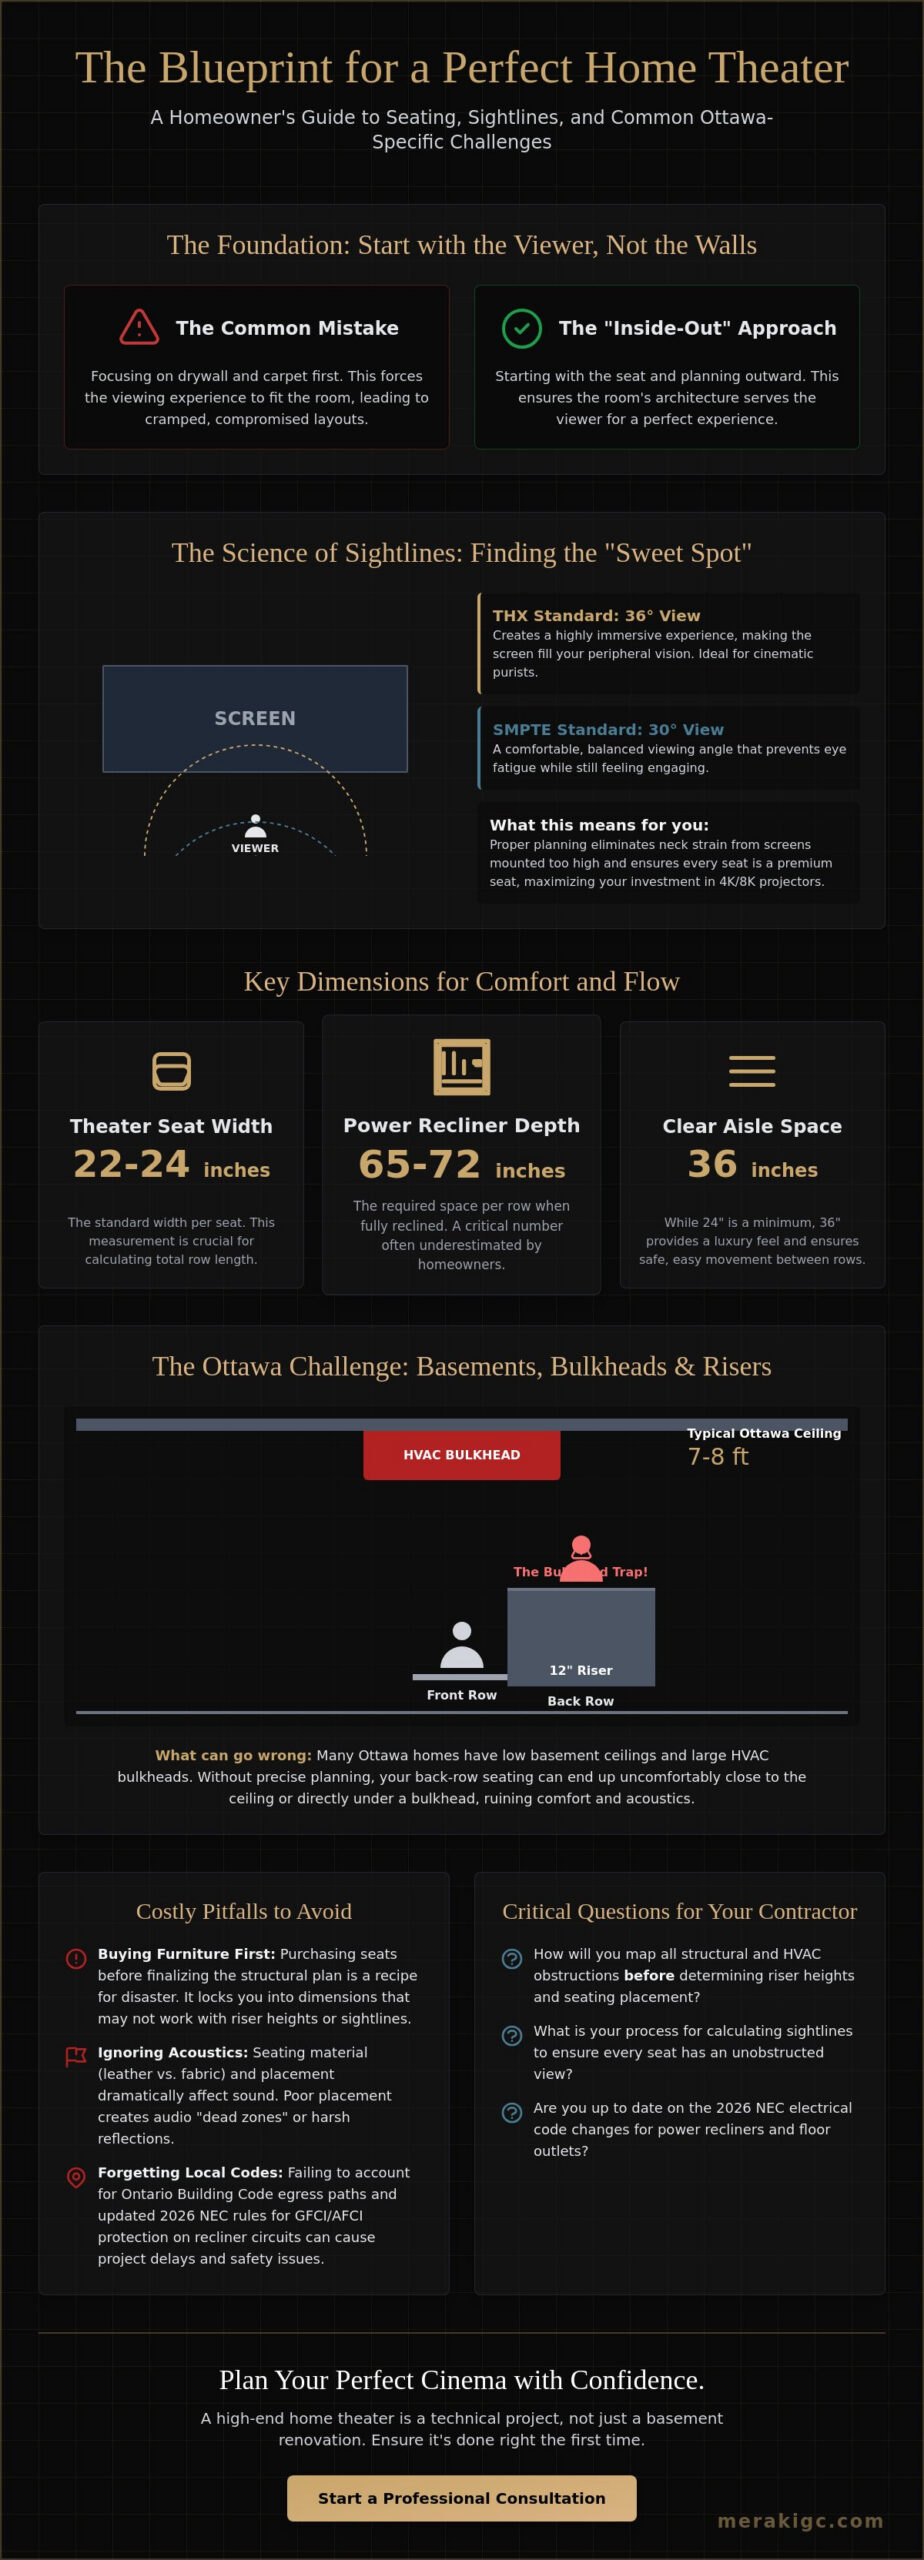
Most homeowners we speak to in Ottawa start their project by looking at the four walls of their basement. They focus on the drywall and the carpet first, but this is where projects go wrong. A professional custom home theater design actually starts from the seat and works outward. We call this the “Inside-Out” approach. By using a home theater seating layout planner as your primary anchor, you ensure that the architecture of the room serves the viewer, not the other way around. It’s about defining the experience before you commit to the construction.
When we talk about high-end viewing, we look at industry standards like SMPTE and THX. SMPTE suggests a 30-degree viewing angle, while THX pushes for a more immersive 36-degree field of vision. Understanding these Home Cinema Fundamentals allows us to place your seating where the screen fills your peripheral vision without making you turn your head. This level of technical planning is what separates a luxury cinema from a simple media room.
A precise seating plan eliminates “neck strain” from looking up at a screen that’s mounted too high. It also prevents “dead zones” where the audio feels hollow or muddy. You get a space that feels like a private cinema rather than a basement with some chairs in it. This clarity allows you to invest your budget where it actually impacts your enjoyment.
The Math of Sightlines and Screen Distance
The “Sweet Spot” in a room depends heavily on your screen resolution. With 4K and 8K projectors, you can sit closer without seeing individual pixels. However, the front row is often placed too close out of a desire for immersion, which leads to eye fatigue. We calculate the minimum viewing distance for the back row to ensure secondary tiers still get a high-resolution experience. If the back row is too far, the benefit of an 8K screen is lost because the human eye can’t resolve that level of detail at a distance. Our process ensures every seat is a premium seat.
Acoustic Symmetry and Seating Placement
Your choice of seating affects more than just comfort; it’s a major part of your room’s acoustic treatment. Leather reflects sound, while fabric absorbs it. We use a home theater seating layout planner to avoid placing rows in areas where bass peaks or nulls occur. This technical placement is then integrated with home automation ottawa. This allows your motorized recliners to sync with your lighting and audio, creating a seamless transition from a bright room to a darkened, immersive cinema environment.
Technical Realities: Risers, Spacing, and Ottawa Constraints
Most homeowners we speak to in Ottawa overlook the vertical reality of their basement until the drywall is already up. While a professional home theater seating layout planner account for the horizontal floor space, it must also solve the puzzle of your ceiling height. In neighborhoods like Westboro or Rockcliffe, basement ceilings often hover between 7 and 8 feet. If you install a standard 12 inch riser to clear the sightlines of the front row, you may find your back-row guests uncomfortably close to the ceiling or, worse, blocked by structural bulkheads.
Here’s where projects go wrong. Many Ottawa homes have large HVAC bulkheads running through the center of the basement. If your seating layout isn’t coordinated with these obstructions, your tiered seating might place a viewer’s head directly level with a bulkhead. This ruins the acoustic experience and creates a cramped, claustrophobic feeling that devalues your investment. We recommend mapping these “fixed” elements before finalizing your riser height.
To ensure every seat meets Ontario Building Code safety standards, your layout must include clear egress paths. While a 24 inch aisle is the functional minimum for movement, we aim for a 36 inch standard in high-end builds to maintain a sense of luxury and accessibility. This is especially vital when navigating the 2026 NEC updates, which require specific GFCI and AFCI protection for the power-recline circuits and floor outlets integrated into your risers.
Calculating Row Spacing for Recliners
Luxury recliners are larger than most people realize. A standard theater seat is 22 to 24 inches wide, but a power recliner requires 65 to 72 inches of depth when fully extended. To avoid a cramped environment, you need to allow 6.5 to 7 feet of floor space per row. If you are working with a narrow footprint, we often suggest straight rows rather than curved ones; curved rows can consume an extra 12 to 18 inches of room width, which might be better used for acoustic treatments or wider aisles.
Structural and Mechanical Integration
Adding a dedicated cinema with 6 to 8 people into a confined basement creates a significant “heat load.” Your HVAC system must be balanced to provide even airflow without the noise of rushing air distracting from the movie. Additionally, your electrician needs to pre-wire for both power-recline motors and “bass shakers” which are tactile transducers mounted inside the chairs. For a deeper look at the foundation of these projects, you can review our basement renovations ottawa guide. Proper execution depends on a structured planning process that aligns these mechanical needs with your aesthetic goals from day one.
Executing the Build: Costs, Risks, and the Meraki Process
Most homeowners we speak to are tempted to browse furniture showrooms before they have a finalized floor plan. This “Chairs First” mentality is one of the most common ways projects go wrong. If you purchase luxury recliners before using a home theater seating layout planner to define your riser heights and aisle widths, you’re forcing a technical environment to adapt to a sofa. In high-end Ottawa builds, the structural execution of the seating area—including custom risers, integrated step lighting, and premium seating—often falls into a budget range of $15,000 to over $50,000. Treating this as a structural project rather than a furniture purchase ensures your investment delivers a true cinematic result.
What should you watch for during construction? Low-quality riser builds are a significant risk. If a contractor builds a riser like a basic backyard deck, it will likely vibrate or squeak when your subwoofers hit low-frequency notes. A professional theater riser should be sand-filled or heavily insulated to act as a bass trap, preventing the floor from becoming a giant drum that ruins your audio clarity.
Before you sign a contract, ask your contractor: “How will the seating layout affect the room’s sound isolation and HVAC?” A row of six to eight people generates a surprising amount of heat. If your riser blocks a return air vent or your seating placement interferes with acoustic wall panels, the room will never be comfortable. You need a partner who understands that every chair is a component of a larger mechanical system.
The Meraki “Measured, Managed, MasterCrafted” Difference
Our pre-construction planning process eliminates layout surprises by coordinating every trade before we swing a hammer. We use a data-driven approach to scope every riser and electrical run, providing you with pricing transparency and a clear project roadmap. You can track the progress of your theater build in real-time through our live dashboards, ensuring you stay informed from the first measurement to the final calibration.
Next Steps for Your Ottawa Home Theater
For high-stakes investments, a design-build ottawa approach is significantly safer. It ensures that the designer calculating your sightlines is in constant communication with the team building your floor. When you’re ready to transition from a seating plan to a full construction schedule, schedule a consultation with Meraki GC to mastercraft your cinema.
Finalizing Your Vision for High-End Viewing
Building a world-class cinema in your Ottawa home is a technical achievement that requires more than just high-end equipment. It’s about the deliberate coordination of sightlines, acoustics, and structural integrity. By using a home theater seating layout planner early in your project, you avoid the common pitfalls of cramped rows or blocked views that plague so many basement renovations. You’ve learned that the secret to a perfect viewing experience lies in the math of the risers and the transparency of the construction process.
At Meraki GC, we bring local expertise to every high-end residential project. Our proprietary “Measured, Managed, MasterCrafted” process ensures that your theater is built with precision, while our fixed-price contracts for basement conversions provide the financial clarity you need. We handle the complexities of Ontario Building Codes and Ottawa’s unique basement constraints so you don’t have to worry about the technical details.
When you’re ready to move from vision to reality, we’re here to help you navigate every decision with honesty and transparency. MasterCraft your home theater with Meraki GC’s expert design-build team and ensure your investment delivers a true cinematic escape. Your perfect front-row seat is closer than you think.
Frequently Asked Questions
How much space do I need between rows in a home theater?
You should plan for 6.5 to 7 feet of depth for every row if you are using luxury power recliners. This measurement ensures that when a guest in the front row is fully extended, there is still enough room for someone in the back row to move past. For the walking aisles, a width of 36 inches is the preferred standard for a high-end feel, though 24 inches is the functional minimum required for movement.
What is the ideal height for a home theater riser?
The ideal riser height typically falls between 8 and 12 inches for most residential applications. The specific height depends on the distance from the screen and the height of the viewers in the front row. Most homeowners we speak to find that a 12 inch riser provides the clearest sightlines, but this must be balanced against your basement ceiling height to ensure guests don’t feel cramped.
Do I need a permit for a home theater layout in Ottawa?
Yes, you generally require a building permit in Ottawa when your theater project involves structural changes or new electrical and HVAC work. Since a tiered layout requires building risers and adding dedicated circuits for power recliners, the City of Ottawa must inspect the work to ensure it meets the Ontario Building Code. Working with a professional home theater seating layout planner helps ensure these technical requirements are met before the inspection occurs.
Can I put a theater in a basement with low ceilings?
You can certainly build a theater in a basement with 7 foot ceilings, but you may need to limit your seating to a single row. Adding a riser in a low-ceiling environment often places the back row too close to the ceiling or structural bulkheads. If a second tier is essential, we often design a shallow riser and use “wall-hugger” recliners to maximize the available vertical and horizontal space.
Should I choose a straight or curved seating layout?
Straight rows are usually the best choice for the narrow basement footprints often found in Ottawa and Prescott-Russell. They are space-efficient and keep your aisles clear. Curved layouts provide a more immersive “cockpit” feel and better viewing angles for guests on the ends, but they require a much wider room and more floor depth to execute without creating wasted space in the corners.
How far should the first row be from a 120-inch screen?
The first row should typically be positioned between 12 and 15 feet away from a 120 inch screen. This distance allows the image to fill your field of vision without requiring you to turn your head to follow the action. If you are using a high-resolution 4K or 8K projector, you can sit at the closer end of that range because the pixel structure is nearly invisible to the human eye at that distance.

Article by
~ Jason Bourguignon
Jason has been passionate about building homes from a young age, starting his first successful construction company at age 21. With experience across nearly every sector of the industry, he brings a hands-on understanding of the entire building process. For over two decades, he has managed hundreds of custom home builds, additions, and renovations with some single projects exceeding $2.5M. Jason does not just focus on construction, but also helps homeowners create spaces they truly call home.
Disclaimer
The information in this article is provided for general educational purposes only and is based on typical renovation scenarios in Ontario. Every project is unique, and actual costs, timelines, and requirements may vary. This content does not constitute professional, legal, or engineering advice. We recommend consulting with a qualified contractor or specialist for your specific project.